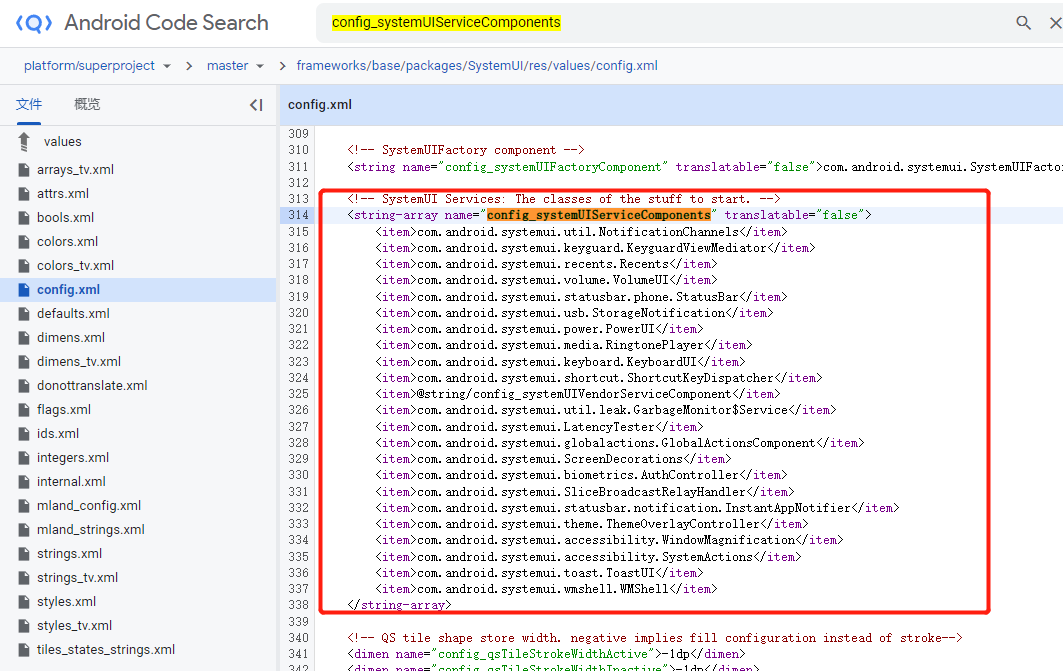
在Android系统中,有关系统状态栏有关得代码在/framework/base/packages/SystemUI中。Android系统启动的时候,会通过Java反射的方式启动。其启动SystemUI的SystemUIService服务。SystemUISercice是Service的一个子类,同时该类中通过反射机制同时启动了好几个和系统UI相关的服务。这些服务都是继承自SystemUI类。在SystemUIService的onCreate里面,创建其他的服务:
1
2
3
4
5
6
7
8
9
10
11
12
13
14
15
16
17
18
| public class SystemUIService extends Service {
@Override
public void onCreate() {
super.onCreate();
((SystemUIApplication) getApplication()).startServicesIfNeeded();
}
}
public void startServicesIfNeeded() {
String[] names = SystemUIFactory.getInstance().getSystemUIServiceComponents(getResources());
startServicesIfNeeded("StartServices", names);
}
public String[] getSystemUIServiceComponents(Resources resources) {
return resources.getStringArray(R.array.config_systemUIServiceComponents);
}
|
可以看到需要开启的系统服务他们放到了array资源文件里面了,这里我们可以通过这个网站在线查看系统源码:
(可以看到系统启动了这么多的系统ui服务)
在Android系统中,进程可以分为两类系统进程和应用进程。
- 系统进程:(如:init,zygote,sysetm_server进程)这些都是一直存活的,常驻内存中。系统进程如果出问题了,那你的手机就没法使用了。
- 应用进程:指应用程序运行的进程。电话,短信,微信。
进程间的运行是独立的,一个进程奔溃异常退出并不会影响到其他进程的正常运行。
app_process:这是一个可执行程序,用来启动zygote和system_server进程。
ActivityManager:负责Android全部四大组件的管理,并且还掌握了所有应用程序进程的创建和进程的优先级管理。
init进程是一切的开始,init进程里面配置了需要继续启动哪些系统进程。这其中有两个特别重要的进程zygote和system_server。
- zygote:所有的进程都是通过zygote进程fork出来的子进程。因此zygote进程是所有应用进程的父进程。
- system_server:这个进程正如他的名字一样,这是一个系统服务器。Framework层的几乎所有服务都位于这个进程中。其中包括管理四大组件的
ActivityManagerService
zygote这个进程启动的时候会接着启动ZygoteInitRuntimeInit。
zygoteInit是一个java代码。所有的应用进程都是通过发送数据到这个套接字上,然后由zytote进程创建。
在这个类的main方法里面执行了一个preload方法:这是Android启动最耗时间的两件事,preloadCLassess将framework.jar里的preloaded-classes定义的所有class load到内存里,preloaded-classes 编译Android后可以在framework/base下找到。而preloadResources 将系统的Resource(不是在用户apk里定义的resource)load到内存。
1
2
3
4
| static void preload() {
preloadClasses();
preloadResources();
}
|
system_server:这个进程启动了大量的服务系统服务,比如:
- 网络管理:NetworkManagementService
- 窗口管理:WindowManagerService
- 震动管理:VibratorService
- 输入管理:InputManagerService
- 活动管理:ActivityMangerService
system_server进程的类是SystemServer这个java类。关于一个Service的启动需要知道的步骤是:
- 初始化Serivice对象,获得IBinder对象。
- 启动后台线程,并进入Loop等待
- 将自己注册到Service Manager,让其他进程通过名字可以获得远程调用必须的IBinder的对象。
在SystemServer的main方法:
1
2
3
4
5
6
7
8
9
10
11
12
13
14
15
16
17
18
19
20
21
22
23
24
25
|
public static void main(String[] args) {
new SystemServer().run();
}
private void run() {
......
Looper.prepareMainLooper();
System.loadLibrary("android_servers");
......
createSystemContext();
mSystemServiceManager = new SystemServiceManager(mSystemContext);
......
startBootstrapServices();
startCoreServices();
startOtherServices();
....
}
|
可以看到创建了SystemServiceManager。这个类就是创建所有服务的方法。都是通过SystemServiceManager.startService方法进行的创建:
1
2
3
4
5
6
7
8
9
10
11
12
13
14
15
16
17
18
19
20
21
22
23
24
25
26
27
28
29
30
31
32
33
34
35
| private void startBootstrapServices(@NonNull TimingsTraceAndSlog t) {
mSystemServiceManager.startService(FileIntegrityService.class);
mSystemServiceManager.startService(DeviceIdentifiersPolicyService.class);
mSystemServiceManager.startService(UriGrantsManagerService.Lifecycle.class);
ActivityTaskManagerService atm = mSystemServiceManager.startService(
ActivityTaskManagerService.Lifecycle.class).getService();
mActivityManagerService = ActivityManagerService.Lifecycle.startService(
mSystemServiceManager, atm);
mActivityManagerService.setSystemServiceManager(mSystemServiceManager);
mActivityManagerService.setInstaller(installer);
mWindowManagerGlobalLock = atm.getGlobalLock();
mDataLoaderManagerService = mSystemServiceManager.startService(
DataLoaderManagerService.class);
mIncrementalServiceHandle = startIncrementalService();
mPowerManagerService = mSystemServiceManager.startService(PowerManagerService.class);
mSystemServiceManager.startService(ThermalManagerService.class);
mActivityManagerService.initPowerManagement();
mSystemServiceManager.startService(RecoverySystemService.Lifecycle.class);
RescueParty.registerHealthObserver(mSystemContext);
PackageWatchdog.getInstance(mSystemContext).noteBoot();
mSystemServiceManager.startService(LightsService.class);
if (SystemProperties.getBoolean("config.enable_sidekick_graphics", false)) {
mSystemServiceManager.startService(WEAR_SIDEKICK_SERVICE_CLASS);
}
mDisplayManagerService = mSystemServiceManager.startService(DisplayManagerService.class);
mSystemServiceManager.startBootPhase(t, SystemService.PHASE_WAIT_FOR_DEFAULT_DISPLAY);
mPackageManager = mSystemContext.getPackageManager();
mSystemServiceManager.startService(UserManagerService.LifeCycle.class);
AttributeCache.init(mSystemContext);
mActivityManagerService.setSystemProcess();
watchdog.init(mSystemContext, mActivityManagerService);
mDisplayManagerService.setupSchedulerPolicies();
mSystemServiceManager.startService(new OverlayManagerService(mSystemContext));
mSystemServiceManager.startService(new SensorPrivacyService(mSystemContext));
}
|
可以看到ActivityManagerService被创建了。
现在来看下startOtherServices(),从名字我们知道这是在创建其他服务。其他都有那些呢。我们打开Context这个类就知道了:
1
2
3
4
5
6
7
8
9
10
11
12
13
14
15
16
17
18
19
20
21
22
23
| class Context{
public static final String POWER_SERVICE = "power";
public static final String RECOVERY_SERVICE = "recovery";
@SystemApi
public static final String SYSTEM_UPDATE_SERVICE = "system_update";
public static final String WINDOW_SERVICE = "window";
public static final String LAYOUT_INFLATER_SERVICE = "layout_inflater";
public static final String ACCOUNT_SERVICE = "account";
public static final String ACTIVITY_TASK_SERVICE = "activity_task";
public static final String ALARM_SERVICE = "alarm";
public static final String KEYGUARD_SERVICE = "keyguard";
}
|
这里我们拿WindowManagerService这个服务来看:
1
2
3
4
5
6
7
8
9
10
11
12
13
14
|
private void startOtherServices(@NonNull TimingsTraceAndSlog t) {
WindowManagerService wm = null;
wm = WindowManagerService.main(context, inputManager, !mFirstBoot, mOnlyCore,
new PhoneWindowManager(), mActivityManagerService.mActivityTaskManager);
ServiceManager.addService(Context.WINDOW_SERVICE, wm,false,
DUMP_FLAG_PRIORITY_CRITICAL | DUMP_FLAG_PROTO);
InputManagerService inputManager = null;
inputManager = new InputManagerService(context);
ServiceManager.addService(Context.INPUT_SERVICE, inputManager,
false, DUMP_FLAG_PRIORITY_CRITICAL);
}
|
我们可以看到创建的WindowManagerService对象被保存在了ServiceManager里面。然后我们就可以通过ServiceManager.getService(name:String)来获取置顶的服务就行了。所以以后你在阅读源码时看到。。。ServiceManager.getService的时候不知道这个获取的服务对象到底是什么时候。你可以进入类SystemServer里面看下,在调用ServiceManager.addService方法添加了什么服务进去。
