掉用Recycleview的setAdapter的时候会去执行recycleview的requestlayout:
1 2 3 4 5 6 7 8 public void setAdapter (@Nullable Adapter adapter) setLayoutFrozen(false ); setAdapterInternal(adapter, false , true ); processDataSetCompletelyChanged(false ); requestLayout(); }
然后在(Recycleview)onLayout里面执行了dispatchLayout:
1 2 3 4 5 6 7 8 @Override protected void onLayout (boolean changed, int l, int t, int r, int b) TraceCompat.beginSection(TRACE_ON_LAYOUT_TAG); dispatchLayout(); TraceCompat.endSection(); mFirstLayoutComplete = true ; }
接着调用dispatchLayout(),这里面可以看到很关键的三个方法:dispatchLayoutStep1() dispatchLayoutStep2() dispatchLayout3()。 最主要是在dispatchLayoutStep2()里面,有一个while循环,在whill循环里面我们通过判断当前itempostion的值是否小于我们在adapter里面设置的getItemCount()的值,来动态addView子view进去。现在我们来看下dispatchLayoutStep2()方法。
1 2 3 4 5 6 7 8 9 10 11 12 13 14 15 16 17 18 19 20 21 22 void dispatchLayout () if (mAdapter == null ) { return ; } if (mLayout == null ) { return ; } mState.mIsMeasuring = false ; if (mState.mLayoutStep == State.STEP_START) { dispatchLayoutStep1(); mLayout.setExactMeasureSpecsFrom(this ); dispatchLayoutStep2(); } else if (mAdapterHelper.hasUpdates() || mLayout.getWidth() != getWidth() || mLayout.getHeight() != getHeight()) { mLayout.setExactMeasureSpecsFrom(this ); dispatchLayoutStep2(); } else { mLayout.setExactMeasureSpecsFrom(this ); } dispatchLayoutStep3(); }
来看下dispatchLayout2()
1 2 3 4 5 6 7 8 9 10 11 12 13 14 private void dispatchLayoutStep2 () ---- mState.mItemCount = mAdapter.getItemCount(); mState.mDeletedInvisibleItemCountSincePreviousLayout = 0 ; mState.mInPreLayout = false ; mLayout.onLayoutChildren(mRecycler, mState); mState.mStructureChanged = false ; mPendingSavedState = null ; ------ }
viewpager2每次调用setCurrentItem(position)的时候会触发requestlayout,requestlayout都是层层往上回归调用的,知道调用到viewRoomtImpl的requestlayout方法,然后调用到viewrootimpl的perfromTraversals方法。他又是由viewRootImpl的doTraversal调用。doTraversal是在一个runable里面调用的。
Recycleview的suppressLayout里面将mLayoutSuppressed
mLayoutSuppressed:是否阻止recycleview的layout
mLayoutWasDefered:如果对 requestLayout 的调用被拦截并阻止正常执行,并且我们计划稍后继续正常执行,则为 True。
mInterceptRequestLayoutDepth:当前调用startInterceptRequestLayout()的嵌套深度(调用startInterceptRequestLayout()的次数-调用stopInterceptRequestLayout的次数(boolean))。这用于指示我们是否应该推迟由RecyclerView子节点的布局请求引起的布局操作。
Recycleview里面有一个教 mState:State 的变量,用来保存当前recycleliew当前所处于的状态,分别为:
STEP_STARP= 1
STEP_LAYOUT = 1<<1
STEP_ANIMATIONS = 1
默认情况下mState.mLayoutStep的初始值为STEP_START。
mState.mLayoutStep的值有三个地方进行赋值,分别为:
Recycleview的dispatchLayoutStep1() 将其赋值为State.STEP_Layout
Recycleview的dispatchLayoutStep2() 将其赋值为State.Step.STEP_ANIMATIONS
Recycleview的dispatchLayout3() 将其赋值为State.STEP_START
来看下Recycleview的onMeasure方法:
1 2 3 4 5 6 7 8 9 10 11 12 13 14 15 16 17 18 protected void onMeasure (int widthSpec,int heightSpec) if (mLayout.isAutoMeasureEnabled()){ if (mState.mLayoutStep == Step.STEP_START){ dispatchLayoutStep1(); } mState.mIsMeaturing = true ; dispatchLayoutStep2(); if (mLayout.shouldMeasureTwice()){ mState.mIsMeasuring = true ; dispatchLayoutStep2(); } }else { } startInterceptRequestLayout(mRecycler,mState,widthSpec,heightSpec); stopInterceptRequestLayout(false ); mState.mInPreLayout = false ; }
来看下onLayout方法:
1 2 3 4 protected void onLayout (boolean changed,int l,int t,int r,int b) dispatchLayout(); mFirstLayoutComplete = true ; }
1 2 3 4 5 6 7 8 9 Recycler{ final ArrayList<ViewHolder> mAttachedScrap = new ArrayList<>(); ArrayList<ViewHolder> mChangedScrap = null ; final ArrayList<ViewHolder> mCachedViews = new ArrayList<ViewHolder>(); private final List<ViewHolder> mUnmodifiableAttachedScrap = Collections.unmodifiableList(mAttachedScrap); }
在onResume里面调用到Recycleview的onAttachToWindow方法,将参数mIsAttaches设置为了true。
然后Recycleview在onAttachToWindow里面里面调用了mLayout.dispatchAttachedToWindow()。
RecyckeView的布局分为三个步骤
dispatchLayoutStep1
dispatchLayoutStep2
dispatchLayoutStep3
1 2 3 4 5 6 7 8 9 10 11 12 13 14 15 16 17 void dispatchLayout () mState.mIsMeasuring = false ; if (mState.mLayoutStep == State.STEP_START) { dispatchLayoutStep1(); mLayout.setExactMeasureSpecsFrom(this ); dispatchLayoutStep2(); } else if (mAdapterHelper.hasUpdates() || mLayout.getWidth() != getWidth() || mLayout.getHeight() != getHeight()) { mLayout.setExactMeasureSpecsFrom(this ); dispatchLayoutStep2(); } else { mLayout.setExactMeasureSpecsFrom(this ); } dispatchLayoutStep3(); }
1 2 3 4 5 6 7 8 9 10 11 12 13 14 15 16 17 18 19 20 21 22 23 24 25 26 27 28 29 30 31 32 33 34 35 36 37 38 39 40 41 42 43 44 private void dispatchLayoutStep1 () mState.assertLayoutStep(State.STEP_START); fillRemainingScrollValues(mState); mState.mIsMeasuring = false ; startInterceptRequestLayout(); mViewInfoStore.clear(); onEnterLayoutOrScroll(); processAdapterUpdatesAndSetAnimationFlags(); saveFocusInfo(); mState.mTrackOldChangeHolders = mState.mRunSimpleAnimations && mItemsChanged; mItemsAddedOrRemoved = mItemsChanged = false ; mState.mInPreLayout = mState.mRunPredictiveAnimations; mState.mItemCount = mAdapter.getItemCount(); findMinMaxChildLayoutPositions(mMinMaxLayoutPositions); if (mState.mRunSimpleAnimations) { } if (mState.mRunPredictiveAnimations) { } else { clearOldPositions(); } onExitLayoutOrScroll(); stopInterceptRequestLayout(false ); mState.mLayoutStep = State.STEP_LAYOUT; }
1 2 3 4 5 6 7 8 9 10 11 12 13 14 15 16 17 18 19 20 21 22 23 24 25 26 27 28 29 30 31 32 33 34 private void dispatchLayoutStep2 () startInterceptRequestLayout(); onEnterLayoutOrScroll(); mState.assertLayoutStep(State.STEP_LAYOUT | State.STEP_ANIMATIONS); mAdapterHelper.consumeUpdatesInOnePass(); mState.mItemCount = mAdapter.getItemCount(); mState.mDeletedInvisibleItemCountSincePreviousLayout = 0 ; mState.mInPreLayout = false ; mLayout.onLayoutChildren(mRecycler, mState); mState.mStructureChanged = false ; mPendingSavedState = null ; mState.mRunSimpleAnimations = mState.mRunSimpleAnimations && mItemAnimator != null ; mState.mLayoutStep = State.STEP_ANIMATIONS; onExitLayoutOrScroll(); stopInterceptRequestLayout(false ); }
1 2 3 4 5 6 7 8 9 10 11 12 13 14 15 16 17 18 19 20 21 22 23 24 25 26 27 28 29 30 31 32 33 34 35 36 37 private void dispatchLayoutStep3 () mState.assertLayoutStep(State.STEP_ANIMATIONS); startInterceptRequestLayout(); onEnterLayoutOrScroll(); mState.mLayoutStep = State.STEP_START; if (mState.mRunSimpleAnimations) { } mLayout.removeAndRecycleScrapInt(mRecycler); mState.mPreviousLayoutItemCount = mState.mItemCount; mDataSetHasChangedAfterLayout = false ; mDispatchItemsChangedEvent = false ; mState.mRunSimpleAnimations = false ; mState.mRunPredictiveAnimations = false ; mLayout.mRequestedSimpleAnimations = false ; if (mRecycler.mChangedScrap != null ) { mRecycler.mChangedScrap.clear(); } if (mLayout.mPrefetchMaxObservedInInitialPrefetch) { mLayout.mPrefetchMaxCountObserved = 0 ; mLayout.mPrefetchMaxObservedInInitialPrefetch = false ; mRecycler.updateViewCacheSize(); } mLayout.onLayoutCompleted(mState); onExitLayoutOrScroll(); stopInterceptRequestLayout(false ); mViewInfoStore.clear(); if (didChildRangeChange(mMinMaxLayoutPositions[0 ], mMinMaxLayoutPositions[1 ])) { dispatchOnScrolled(0 , 0 ); } recoverFocusFromState(); resetFocusInfo(); }
分析完成可以看到Recycleview的页面展示是在disPatchLayoutStep2()里面的mLayout.onLayoutChildren(mRecycler,mState)。
看下LinearLayoutManager:
1 2 3 4 5 6 7 8 9 10 11 12 13 14 15 16 17 18 19 20 21 22 23 24 25 26 27 28 29 30 31 32 33 34 35 36 37 38 39 40 41 42 43 44 45 46 47 48 49 50 51 52 53 54 55 56 57 58 59 60 61 62 63 64 65 66 67 68 69 70 71 72 73 74 75 76 77 78 79 80 81 82 83 84 85 86 87 88 89 90 91 92 93 94 95 96 97 98 99 100 101 102 103 104 105 106 107 108 109 110 111 112 113 114 115 116 117 118 119 120 121 122 123 124 125 126 127 128 129 130 131 132 133 134 135 136 137 138 139 140 141 142 143 144 145 146 147 148 149 150 151 152 153 154 155 156 157 158 159 160 161 162 163 164 165 166 167 168 169 170 171 172 public void onLayoutChildren (RecyclerView.Recycler recycler, RecyclerView.State state) if (mPendingSavedState != null || mPendingScrollPosition != RecyclerView.NO_POSITION) { if (state.getItemCount() == 0 ) { removeAndRecycleAllViews(recycler); return ; } } if (mPendingSavedState != null && mPendingSavedState.hasValidAnchor()) { mPendingScrollPosition = mPendingSavedState.mAnchorPosition; } ensureLayoutState(); mLayoutState.mRecycle = false ; resolveShouldLayoutReverse(); final View focused = getFocusedChild(); if (!mAnchorInfo.mValid || mPendingScrollPosition != RecyclerView.NO_POSITION || mPendingSavedState != null ) { mAnchorInfo.reset(); mAnchorInfo.mLayoutFromEnd = mShouldReverseLayout ^ mStackFromEnd; updateAnchorInfoForLayout(recycler, state, mAnchorInfo); mAnchorInfo.mValid = true ; } else if (focused != null && (mOrientationHelper.getDecoratedStart(focused) >= mOrientationHelper.getEndAfterPadding() || mOrientationHelper.getDecoratedEnd(focused) <= mOrientationHelper.getStartAfterPadding())) { mAnchorInfo.assignFromViewAndKeepVisibleRect(focused, getPosition(focused)); } mLayoutState.mLayoutDirection = mLayoutState.mLastScrollDelta >= 0 ? LayoutState.LAYOUT_END : LayoutState.LAYOUT_START; mReusableIntPair[0 ] = 0 ; mReusableIntPair[1 ] = 0 ; calculateExtraLayoutSpace(state, mReusableIntPair); int extraForStart = Math.max(0 , mReusableIntPair[0 ]) + mOrientationHelper.getStartAfterPadding(); int extraForEnd = Math.max(0 , mReusableIntPair[1 ]) + mOrientationHelper.getEndPadding(); if (state.isPreLayout() && mPendingScrollPosition != RecyclerView.NO_POSITION && mPendingScrollPositionOffset != INVALID_OFFSET) { final View existing = findViewByPosition(mPendingScrollPosition); if (existing != null ) { final int current; final int upcomingOffset; if (mShouldReverseLayout) { current = mOrientationHelper.getEndAfterPadding() - mOrientationHelper.getDecoratedEnd(existing); upcomingOffset = current - mPendingScrollPositionOffset; } else { current = mOrientationHelper.getDecoratedStart(existing) - mOrientationHelper.getStartAfterPadding(); upcomingOffset = mPendingScrollPositionOffset - current; } if (upcomingOffset > 0 ) { extraForStart += upcomingOffset; } else { extraForEnd -= upcomingOffset; } } } int startOffset; int endOffset; final int firstLayoutDirection; if (mAnchorInfo.mLayoutFromEnd) { firstLayoutDirection = mShouldReverseLayout ? LayoutState.ITEM_DIRECTION_TAIL : LayoutState.ITEM_DIRECTION_HEAD; } else { firstLayoutDirection = mShouldReverseLayout ? LayoutState.ITEM_DIRECTION_HEAD : LayoutState.ITEM_DIRECTION_TAIL; } onAnchorReady(recycler, state, mAnchorInfo, firstLayoutDirection); detachAndScrapAttachedViews(recycler); mLayoutState.mInfinite = resolveIsInfinite(); mLayoutState.mIsPreLayout = state.isPreLayout(); mLayoutState.mNoRecycleSpace = 0 ; if (mAnchorInfo.mLayoutFromEnd) { updateLayoutStateToFillStart(mAnchorInfo); mLayoutState.mExtraFillSpace = extraForStart; fill(recycler, mLayoutState, state, false ); startOffset = mLayoutState.mOffset; final int firstElement = mLayoutState.mCurrentPosition; if (mLayoutState.mAvailable > 0 ) { extraForEnd += mLayoutState.mAvailable; } updateLayoutStateToFillEnd(mAnchorInfo); mLayoutState.mExtraFillSpace = extraForEnd; mLayoutState.mCurrentPosition += mLayoutState.mItemDirection; fill(recycler, mLayoutState, state, false ); endOffset = mLayoutState.mOffset; if (mLayoutState.mAvailable > 0 ) { extraForStart = mLayoutState.mAvailable; updateLayoutStateToFillStart(firstElement, startOffset); mLayoutState.mExtraFillSpace = extraForStart; fill(recycler, mLayoutState, state, false ); startOffset = mLayoutState.mOffset; } } else { updateLayoutStateToFillEnd(mAnchorInfo); mLayoutState.mExtraFillSpace = extraForEnd; fill(recycler, mLayoutState, state, false ); endOffset = mLayoutState.mOffset; final int lastElement = mLayoutState.mCurrentPosition; if (mLayoutState.mAvailable > 0 ) { extraForStart += mLayoutState.mAvailable; } updateLayoutStateToFillStart(mAnchorInfo); mLayoutState.mExtraFillSpace = extraForStart; mLayoutState.mCurrentPosition += mLayoutState.mItemDirection; fill(recycler, mLayoutState, state, false ); startOffset = mLayoutState.mOffset; if (mLayoutState.mAvailable > 0 ) { extraForEnd = mLayoutState.mAvailable; updateLayoutStateToFillEnd(lastElement, endOffset); mLayoutState.mExtraFillSpace = extraForEnd; fill(recycler, mLayoutState, state, false ); endOffset = mLayoutState.mOffset; } } if (getChildCount() > 0 ) { if (mShouldReverseLayout ^ mStackFromEnd) { int fixOffset = fixLayoutEndGap(endOffset, recycler, state, true ); startOffset += fixOffset; endOffset += fixOffset; fixOffset = fixLayoutStartGap(startOffset, recycler, state, false ); startOffset += fixOffset; endOffset += fixOffset; } else { int fixOffset = fixLayoutStartGap(startOffset, recycler, state, true ); startOffset += fixOffset; endOffset += fixOffset; fixOffset = fixLayoutEndGap(endOffset, recycler, state, false ); startOffset += fixOffset; endOffset += fixOffset; } } layoutForPredictiveAnimations(recycler, state, startOffset, endOffset); if (!state.isPreLayout()) { mOrientationHelper.onLayoutComplete(); } else { mAnchorInfo.reset(); } mLastStackFromEnd = mStackFromEnd; if (DEBUG) { validateChildOrder(); } }
通过直接的翻译:移除和添加view。
在代码里面我们发现recycleview使用了viewGrouo.detachViewFromParent()和attachViewToParent()。为什么要用这两个方法,因为这比起addView和removeView来说是轻量级的。它不会触发requestLayout方法。
执行detachAndScrapAttachedViews方法,他将recycleview所有的view都执行了detach操作,从recycleview里面移除。
如果这个viewHolder含有移除标志位 INVALID(无效) 或者 不含更新 或者 可以重用更新的
符合以上条件:这个viewHolder将会被添加到mAttachedScrap这个数组里面。否则添加到mChangedScrap数组里面。
1 2 3 4 5 6 7 8 9 10 11 12 13 14 15 16 17 18 private void scrapOrRecycleView (Recycler recycler, int index, View view) final ViewHolder viewHolder = getChildViewHolderInt(view); if (viewHolder.shouldIgnore()) { if (DEBUG) { Log.d(TAG, "ignoring view " + viewHolder); } return ; } if (viewHolder.isInvalid() && !viewHolder.isRemoved() && !mRecyclerView.mAdapter.hasStableIds()) { removeViewAt(index); recycler.recycleViewHolderInternal(viewHolder); } else { detachViewAt(index); recycler.scrapView(view); mRecyclerView.mViewInfoStore.onViewDetached(viewHolder); } }
1 mChildHelper = ChildHelper
1 mAdapterHelper = AdapterHelper
在LinearLayoutManager的构造函数里面:
1 2 3 4 5 6 7 8 9 10 public LinearLayoutManager (Context context, AttributeSet attrs, int defStyleAttr, int defStyleRes) Properties properties = getProperties(context, attrs, defStyleAttr, defStyleRes); setOrientation(properties.orientation); setReverseLayout(properties.reverseLayout); setStackFromEnd(properties.stackFromEnd); }
1 2 3 4 5 6 7 8 9 10 11 12 13 public void setOrientation (@RecyclerView .Orientation int orientation) assertNotInLayoutOrScroll(null ); if (orientation != mOrientation || mOrientationHelper == null ) { mOrientationHelper = OrientationHelper.createOrientationHelper(this , orientation); mAnchorInfo.mOrientationHelper = mOrientationHelper; mOrientation = orientation; requestLayout(); } }
页面上滑的时候滑动增量是大于0的,页面下滑的时候滑动增量式小于零:
1 2 3 mLayoutState.mLayoutDirection = mLayoutState.mLastScrollDelta >= 0 ? LayoutState.LAYOUT_END : LayoutState.LAYOUT_START;
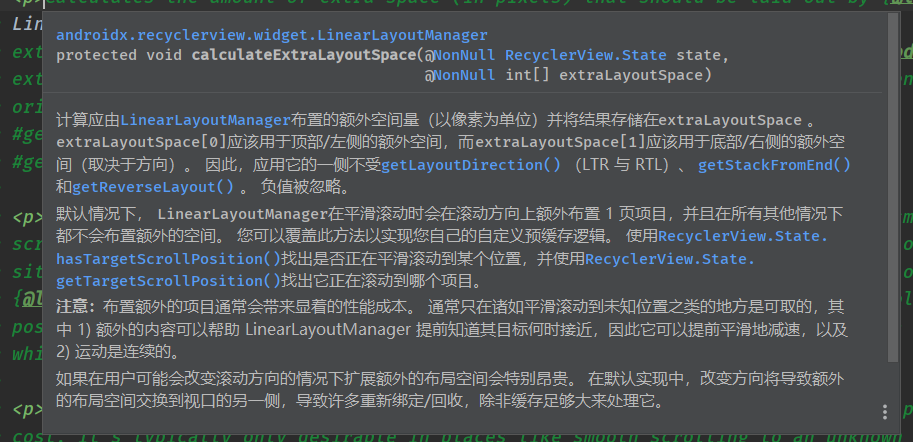
这个方法很重要,他是做缓存计算的,比如,如果你在向上滑动的时候,你想预加载下一项或者夏两项的时候,我们就可以通过这个方法,计算缓存的临界值。在LinearLayoutManager里面,他的计算会报错到extreLayoutSpace数组里面,extraLayoutSpace[0] = 顶部/左侧的额外空间。extraLayoutSpace[1]底部/右侧的额外空间。默认情况下,LinearlayoutManager在平滑滚动时会在滚动方向上额外不知一个项目,并在所有其他i情况下都不会布置额外的空间。你可以覆盖这个方法以实现自己的自定义预缓存逻辑。使用Recycleview.State.hasTargerScrollPosition()找出是否正在平滑滚动到某项位置,并使用Recycleview.Satte.getTargetScrollPosition()找出它正在滚动到哪个项目。
1 2 3 4 5 6 7 8 9 10 11 12 13 14 15 16 17 18 19 20 21 22 23 protected void calculateExtraLayoutSpace (@NonNull RecyclerView.State state, @NonNull int [] extraLayoutSpace) int extraLayoutSpaceStart = 0 ; int extraLayoutSpaceEnd = 0 ; int extraScrollSpace = getExtraLayoutSpace(state); if (mLayoutState.mLayoutDirection == LayoutState.LAYOUT_START) { extraLayoutSpaceStart = extraScrollSpace; } else { extraLayoutSpaceEnd = extraScrollSpace; } extraLayoutSpace[0 ] = extraLayoutSpaceStart; extraLayoutSpace[1 ] = extraLayoutSpaceEnd; }
就是做了个情况操作,把展示在recycleview的内容全部干掉
1 2 3 4 5 6 7 8 9 10 11 12 13 14 15 16 17 18 private void scrapOrRecycleView (Recycler recycler, int index, View view) final ViewHolder viewHolder = getChildViewHolderInt(view); if (viewHolder.shouldIgnore()) { return ; } if (viewHolder.isInvalid() && !viewHolder.isRemoved() && !mRecyclerView.mAdapter.hasStableIds()) { removeViewAt(index); recycler.recycleViewHolderInternal(viewHolder); } else { detachViewAt(index); recycler.scrapView(view); mRecyclerView.mViewInfoStore.onViewDetached(viewHolder); } }
1 2 3 final ArrayList<ViewHolder> mAttachedScrap = new ArrayList<>(); final ArrayList<ViewHolder> mCachedViews = new ArrayList<ViewHolder>(); RecycledViewPool mRecyclerPool;
这些数组都找不到对应的viewHolder,那么就会调用createViewHolder方法。
1 final List<View> mHiddenViews;
1 final ArrayList<UpdateOp> mPostponedList = new ArrayList<UpdateOp>();
mPendingScrollPosition:目标要滚动到的位置
mAnchorInfo.mLayoutFromEnd:是从上往下还是从下往上。
在onLayoutChildren里面判断有没有目标滚动位置(mPendingScrollPosotion)。对AnchorInfo的数据进行了重置,然后设置了mAnchorInfo.mLayoutFromEnd的值(是从上往下还是从下往上布局)。然后执行了updateAnchorInfoForLayout方法目的是计算锥的位置和坐标。
1 2 3 4 5 6 7 8 9 10 11 12 13 14 15 16 17 18 private void updateAnchorInfoForLayout (RecyclerView.Recycler recycler, RecyclerView.State state, AnchorInfo anchorInfo) if (updateAnchorFromPendingData(state, anchorInfo)) { return ; } if (updateAnchorFromChildren(recycler, state, anchorInfo)) { return ; } if (DEBUG) { Log.d(TAG, "deciding anchor info for fresh state" ); } anchorInfo.assignCoordinateFromPadding(); anchorInfo.mPosition = mStackFromEnd ? state.getItemCount() - 1 : 0 ; }
mPosition:用户设置的最先起始布置的位置。默认为0。如果你想从中间开始布局,可以设置你的数据/2的那个位置。然后布局的时候他会从这个位置先往下布局布局结束后在往上
mCoordinate:我在onLayoutChildren的updateAnchorInfoForLayout看到了他的首次赋值是recycleview的paddingTop
mValid:默认为false。有效的意思。
mLayoutFromEnd:是从上往下还是从下往上布局。
在onLayoutChildren里面进行了对象创建。
mLayoutDirection: 根据每次的滑动值来判断滑动方向。如果mLastScrollDelta>=0 则等于1 否则等于-1
mLastScrollDelta:滑动的改变值。
mInfinite:只有当recycleview的测量模式为UNSPECIFIED 并且 recycleview的高度为0,这个值才为true。他的中文意思是 无限。
mIsPreLayout: 他的值等于 state.isPreLayout
mRecycle = faslse
mNoRecycleSapce = 0
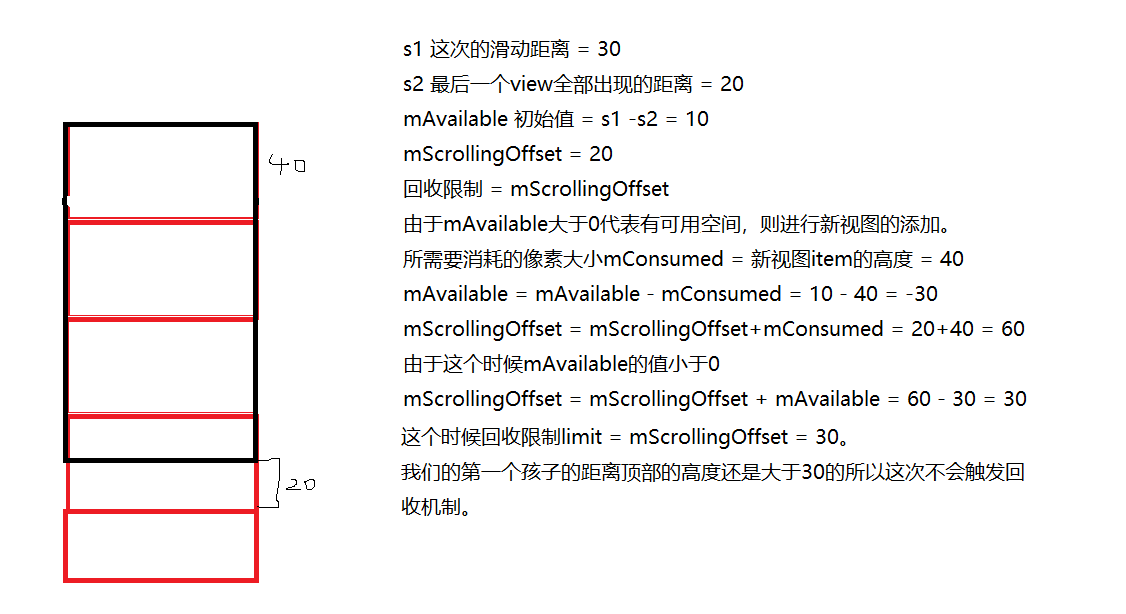
mAvailable:recycleview的高度 - 偏移量(初始的时候偏移量为0)。在滑动的时候 这个值等于 滑动的距离 - 最后一个视图全部展现出来需要滑动的距离。官方解释:在布局放向上,我们应该填充的像素数。
mScrollingOffset:默认值 = LayoutState.SCROLLING_OFFSET_NaN。这个值记录了最后一个子view全部展现在屏幕 或者最上面一个子view全部展现在屏幕上所需要滑动的距离。官方解释:在滚动的时候,这个值代表在不创建新的视图的情况下可以进行的滚动量。
mItemDirection:布局的方向,如果不是反向布局这个值等于1
mCurrentPosition:当前的位置他的首次赋值等于anchorInfo.mPosition
mLayoutDirection:等于1
mExtraFillSpace:中文翻译是额外填充空间。
mScrapList
mOffset:保存布局完成所有view所需要消耗的高度。根据方向进行的累加。每布局完成一次叠加一次。
这张图是对mAvailable 和 mScrollingOffset参数含义的演示。
mCinsumed:布局一个item所需要消耗的高度
mFinished:是否结束布局
mIgnoreConsumed:是否忽略这次布局的消耗值
mFocusable:是否获取焦点
mIsMeasuring: 表示是否正在测量 在onLayout的时候设置为了fasle
mLayoutStep:表示下一步所处阶段,根据这个变量来选择recycleview布局得三步走走哪个。
mRemainingScrollHorizontal: 在横向还需要滑动的距离。
mRemainingScrollVertical: 在纵向还需要滑动的距离。
mItemCount: 它的值等于我们给adapter设置的值。
LinearLayoutManager
哇 这个fill方法只是进行了addView操作,正真的页面平移是在fill结束后才进行的。我们可以看scrollBy方法:先执行了fill方法。然后在执行了offsetChildren方法。
1 2 3 4 5 6 7 8 int scrollBy (int delta, RecyclerView.Recycler recycler, RecyclerView.State state) final int consumed = mLayoutState.mScrollingOffset + fill(recycler, mLayoutState, state, false ); mOrientationHelper.offsetChildren(-scrolled); return scrolled; }
正真进行视图的添加的方法:
里面有一个循环,当剩下的布局空间 > 0 那么就继续这个循环,往Recycleview里面添加布局view。每次添加完成一个view,remainSpace的值就会减去布局这个view所消耗的高度。叠减知道减到小于0。并且我们也没有更过的view的时候。
1 2 3 4 5 6 7 8 9 10 11 12 13 14 15 16 17 18 19 20 21 22 23 24 25 26 27 28 29 30 31 32 33 34 35 36 37 38 39 40 41 42 43 44 45 46 47 48 49 50 51 52 53 54 55 56 57 58 59 60 61 62 63 64 65 66 67 68 69 70 71 72 73 74 75 76 77 78 79 80 81 82 83 84 85 86 87 88 89 90 91 92 93 94 95 96 97 98 99 100 101 102 103 104 105 106 107 108 109 110 111 112 113 114 115 116 117 118 119 120 121 122 int fill (RecyclerView.Recycler recycler, LayoutState layoutState, RecyclerView.State state, boolean stopOnFocusable) final int start = layoutState.mAvailable; if (layoutState.mScrollingOffset != LayoutState.SCROLLING_OFFSET_NaN) { if (layoutState.mAvailable < 0 ) { layoutState.mScrollingOffset += layoutState.mAvailable; } recycleByLayoutState(recycler, layoutState); } int remainingSpace = layoutState.mAvailable + layoutState.mExtraFillSpace; LayoutChunkResult layoutChunkResult = mLayoutChunkResult; while ((layoutState.mInfinite || remainingSpace > 0 ) && layoutState.hasMore(state)) { layoutChunkResult.resetInternal(); layoutChunk(recycler, state, layoutState, layoutChunkResult); if (layoutChunkResult.mFinished) { break ; } layoutState.mOffset += layoutChunkResult.mConsumed * layoutState.mLayoutDirection; if (!layoutChunkResult.mIgnoreConsumed || layoutState.mScrapList != null || !state.isPreLayout()) { layoutState.mAvailable -= layoutChunkResult.mConsumed; remainingSpace -= layoutChunkResult.mConsumed; } if (layoutState.mScrollingOffset != LayoutState.SCROLLING_OFFSET_NaN) { layoutState.mScrollingOffset += layoutChunkResult.mConsumed; if (layoutState.mAvailable < 0 ) { layoutState.mScrollingOffset += layoutState.mAvailable; } recycleByLayoutState(recycler, layoutState); } if (stopOnFocusable && layoutChunkResult.mFocusable) { break ; } } return start - layoutState.mAvailable; } void layoutChunk (RecyclerView.Recycler recycler, RecyclerView.State state, LayoutState layoutState, LayoutChunkResult result) View view = layoutState.next(recycler); if (view == null ) { result.mFinished = true ; return ; } RecyclerView.LayoutParams params = (RecyclerView.LayoutParams) view.getLayoutParams(); if (layoutState.mScrapList == null ) { addView(view); } else { addDisappearingView(view); } measureChildWithMargins(view, 0 , 0 ); result.mConsumed = mOrientationHelper.getDecoratedMeasurement(view); int left, top, right, bottom; if (mOrientation == VERTICAL) { if (isLayoutRTL()) { right = getWidth() - getPaddingRight(); left = right - mOrientationHelper.getDecoratedMeasurementInOther(view); } else { left = getPaddingLeft(); right = left + mOrientationHelper.getDecoratedMeasurementInOther(view); } if (layoutState.mLayoutDirection == LayoutState.LAYOUT_START) { bottom = layoutState.mOffset; top = layoutState.mOffset - result.mConsumed; } else { top = layoutState.mOffset; bottom = layoutState.mOffset + result.mConsumed; } } else { top = getPaddingTop(); bottom = top + mOrientationHelper.getDecoratedMeasurementInOther(view); if (layoutState.mLayoutDirection == LayoutState.LAYOUT_START) { right = layoutState.mOffset; left = layoutState.mOffset - result.mConsumed; } else { left = layoutState.mOffset; right = layoutState.mOffset + result.mConsumed; } } layoutDecoratedWithMargins(view, left, top, right, bottom); if (params.isItemRemoved() || params.isItemChanged()) { result.mIgnoreConsumed = true ; } result.mFocusable = view.hasFocusable(); }
这里需要看LinearLayoutManager的layoutChunk方法里的layoutState.next方法。
在next方法里面调用了recycler.getViewForPosition(position)方法获取想要的view。
来看下recycler.getViewForPosition:
首先进入getScrapOrHiddenOrCachedHolderForPostion方法:
遍历数组:mAttachedScrap : 屏幕内
遍历数组:Childhelper.mHiddenViews
遍历数组:mCachedViews : 屏幕外 大小为2
遍历数组:mViewCacheExtension : 自定义缓存
遍历数组:mRecyclerPool : 缓存池
在没有的话:执行createViewHolder
1 2 3 4 5 6 7 8 9 10 11 12 13 14 15 16 17 18 19 20 21 22 23 24 25 26 27 28 29 30 31 32 33 34 35 36 37 38 39 40 41 42 43 44 45 46 47 48 49 50 51 52 53 54 55 56 57 58 59 60 61 private void updateLayoutState (int layoutDirection, int requiredSpace, boolean canUseExistingSpace, RecyclerView.State state) mLayoutState.mInfinite = resolveIsInfinite(); mLayoutState.mLayoutDirection = layoutDirection; mReusableIntPair[0 ] = 0 ; mReusableIntPair[1 ] = 0 ; calculateExtraLayoutSpace(state, mReusableIntPair); int extraForStart = Math.max(0 , mReusableIntPair[0 ]); int extraForEnd = Math.max(0 , mReusableIntPair[1 ]); boolean layoutToEnd = layoutDirection == LayoutState.LAYOUT_END; mLayoutState.mExtraFillSpace = layoutToEnd ? extraForEnd : extraForStart; mLayoutState.mNoRecycleSpace = layoutToEnd ? extraForStart : extraForEnd; int scrollingOffset; if (layoutToEnd) { mLayoutState.mExtraFillSpace += mOrientationHelper.getEndPadding(); final View child = getChildClosestToEnd(); mLayoutState.mItemDirection = mShouldReverseLayout ? LayoutState.ITEM_DIRECTION_HEAD : LayoutState.ITEM_DIRECTION_TAIL; mLayoutState.mCurrentPosition = getPosition(child) + mLayoutState.mItemDirection; mLayoutState.mOffset = mOrientationHelper.getDecoratedEnd(child); scrollingOffset = mOrientationHelper.getDecoratedEnd(child) - mOrientationHelper.getEndAfterPadding(); } else { final View child = getChildClosestToStart(); mLayoutState.mExtraFillSpace += mOrientationHelper.getStartAfterPadding(); mLayoutState.mItemDirection = mShouldReverseLayout ? LayoutState.ITEM_DIRECTION_TAIL : LayoutState.ITEM_DIRECTION_HEAD; mLayoutState.mCurrentPosition = getPosition(child) + mLayoutState.mItemDirection; mLayoutState.mOffset = mOrientationHelper.getDecoratedStart(child); scrollingOffset = -mOrientationHelper.getDecoratedStart(child) + mOrientationHelper.getStartAfterPadding(); } mLayoutState.mAvailable = requiredSpace; if (canUseExistingSpace) { mLayoutState.mAvailable -= scrollingOffset; } mLayoutState.mScrollingOffset = scrollingOffset; }
再触发一次滑动的时候,比如这次滑动距离为 10 。 最后一个view全部展示出来需要的距离为20。那么:mAvailable = 10 - 20 = -10 mScrollingOffset = 20。
然后进入fill方法。当mAvailable<0 那么重新给mScrollingOffset 设值为: 20 - 10 = 10
1 2 3 4 5 6 7 8 9 10 11 12 13 14 15 16 17 18 19 20 21 22 23 24 25 26 27 28 int scrollBy (int delta, RecyclerView.Recycler recycler, RecyclerView.State state) if (getChildCount() == 0 || delta == 0 ) { return 0 ; } ensureLayoutState(); mLayoutState.mRecycle = true ; final int layoutDirection = delta > 0 ? LayoutState.LAYOUT_END : LayoutState.LAYOUT_START; final int absDelta = Math.abs(delta); updateLayoutState(layoutDirection, absDelta, true , state); final int consumed = mLayoutState.mScrollingOffset + fill(recycler, mLayoutState, state, false ); if (consumed < 0 ) { return 0 ; } final int scrolled = absDelta > consumed ? layoutDirection * consumed : delta; mOrientationHelper.offsetChildren(-scrolled); mLayoutState.mLastScrollDelta = scrolled; return scrolled; }
LinearLayoutManager
这个方法完成了对不可见视图的回收操作。
1 2 3 4 5 6 7 8 9 10 11 12 13 14 15 16 17 18 private void recycleByLayoutState (RecyclerView.Recycler recycler, LayoutState layoutState) if (!layoutState.mRecycle || layoutState.mInfinite) { return ; } int scrollingOffset = layoutState.mScrollingOffset; int noRecycleSpace = layoutState.mNoRecycleSpace; if (layoutState.mLayoutDirection == LayoutState.LAYOUT_START) { recycleViewsFromEnd(recycler, scrollingOffset, noRecycleSpace); } else { recycleViewsFromStart(recycler, scrollingOffset, noRecycleSpace); } }
1 2 3 4 5 6 7 8 9 10 11 12 13 14 15 16 17 18 19 20 21 22 private void recycleViewsFromStart (RecyclerView.Recycler recycler, int scrollingOffset, int noRecycleSpace) if (scrollingOffset < 0 ) { return ; } final int limit = scrollingOffset - noRecycleSpace; final int childCount = getChildCount(); for (int i = 0 ; i < childCount; i++) { View child = getChildAt(i); if (mOrientationHelper.getDecoratedEnd(child) > limit || mOrientationHelper.getTransformedEndWithDecoration(child) > limit) { recycleChildren(recycler, 0 , i); return ; } } }
这是一个接口,在Recycleview出现惯性滑动得时候会被调用:
1 2 3 4 5 6 7 8 9 10 public interface ScrollVectorProvider @Nullable PointF computeScrollVectorForPosition (int targetPosition) ; }
1 2 3 4 5 6 7 8 9 10 11 12 13 14 15 16 17 18 19 20 21 22 23 24 25 26 27 28 29 30 31 32 33 34 35 36 37 38 39 40 41 42 43 44 45 46 47 48 49 50 51 52 53 54 55 56 57 58 59 60 private boolean snapFromFling (@NonNull RecyclerView.LayoutManager layoutManager, int velocityX, int velocityY) if (!(layoutManager instanceof RecyclerView.SmoothScroller.ScrollVectorProvider)) { return false ; } RecyclerView.SmoothScroller smoothScroller = createScroller(layoutManager); if (smoothScroller == null ) { return false ; } int targetPosition = findTargetSnapPosition(layoutManager, velocityX, velocityY); if (targetPosition == RecyclerView.NO_POSITION) { return false ; } smoothScroller.setTargetPosition(targetPosition); layoutManager.startSmoothScroll(smoothScroller); return true ; } @Nullable protected RecyclerView.SmoothScroller createScroller (RecyclerView.LayoutManager layoutManager) { return createSnapScroller(layoutManager); } @Nullable @Deprecated protected LinearSmoothScroller createSnapScroller (RecyclerView.LayoutManager layoutManager) if (!(layoutManager instanceof RecyclerView.SmoothScroller.ScrollVectorProvider)) { return null ; } return new LinearSmoothScroller(mRecyclerView.getContext()) { @Override protected void onTargetFound (View targetView, RecyclerView.State state, Action action) if (mRecyclerView == null ) { return ; } int [] snapDistances = calculateDistanceToFinalSnap(mRecyclerView.getLayoutManager(), targetView); final int dx = snapDistances[0 ]; final int dy = snapDistances[1 ]; final int time = calculateTimeForDeceleration(Math.max(Math.abs(dx), Math.abs(dy))); if (time > 0 ) { action.update(dx, dy, time, mDecelerateInterpolator); } } @Override protected float calculateSpeedPerPixel (DisplayMetrics displayMetrics) return MILLISECONDS_PER_INCH / displayMetrics.densityDpi; } }; }
研究下他是怎么通过手指头抬起得速度判断是否需要滑动到下一页:
1 2 3 4 5 6 7 8 9 10 11 12 13 14 15 16 17 18 19 20 21 22 23 24 25 26 27 28 29 30 31 32 33 34 35 36 37 38 39 40 41 42 43 44 45 46 47 48 49 50 51 52 53 54 55 56 57 58 59 60 61 62 63 64 65 66 67 68 69 70 71 72 73 @Override public int findTargetSnapPosition (RecyclerView.LayoutManager layoutManager, int velocityX, int velocityY) final int itemCount = layoutManager.getItemCount(); if (itemCount == 0 ) { return RecyclerView.NO_POSITION; } final OrientationHelper orientationHelper = getOrientationHelper(layoutManager); if (orientationHelper == null ) { return RecyclerView.NO_POSITION; } View closestChildBeforeCenter = null ; int distanceBefore = Integer.MIN_VALUE; View closestChildAfterCenter = null ; int distanceAfter = Integer.MAX_VALUE; final int childCount = layoutManager.getChildCount(); for (int i = 0 ; i < childCount; i++) { final View child = layoutManager.getChildAt(i); if (child == null ) { continue ; } final int distance = distanceToCenter(layoutManager, child, orientationHelper); if (distance <= 0 && distance > distanceBefore) { distanceBefore = distance; closestChildBeforeCenter = child; } if (distance >= 0 && distance < distanceAfter) { distanceAfter = distance; closestChildAfterCenter = child; } } final boolean forwardDirection = isForwardFling(layoutManager, velocityX, velocityY); if (forwardDirection && closestChildAfterCenter != null ) { return layoutManager.getPosition(closestChildAfterCenter); } else if (!forwardDirection && closestChildBeforeCenter != null ) { return layoutManager.getPosition(closestChildBeforeCenter); } View visibleView = forwardDirection ? closestChildBeforeCenter : closestChildAfterCenter; if (visibleView == null ) { return RecyclerView.NO_POSITION; } int visiblePosition = layoutManager.getPosition(visibleView); int snapToPosition = visiblePosition + (isReverseLayout(layoutManager) == forwardDirection ? -1 : +1 ); if (snapToPosition < 0 || snapToPosition >= itemCount) { return RecyclerView.NO_POSITION; } return snapToPosition; }
可以看到在recycleview内部是通过LayoutManager.getPosition的方法获取view的位置的。再看getPosition的源码。是通过view去获得他的viewHolder然后掉用viewHolder.getLayoutPosition方法获取的
在看PagerSnapHelper的源码发现。
在实现惯性滑动的时候,recycleview的底层是通过这样的方法让recycleview滚动起来的。:
首先我们需要new一个Recycleview.SmoothScroller对象
给Recycleview.SmoothScroller对象设置一个目标滚动位置
调用layoutManager的startSmoothScroll(RecycleView.SmaoothScroller)方法
1 2 3 4 5 6 7 8 9 10 11 RecyclerView.SmoothScroller smoothScroller = createScroller(layoutManager); if (smoothScroller == null ) { return false ; } int targetPosition = 10 smoothScroller.setTargetPosition(targetPosition); layoutManager.startSmoothScroll(smoothScroller);
1 2 3 4 5 6 7 8 public void startSmoothScroll (SmoothScroller smoothScroller) if (mSmoothScroller != null && smoothScroller != mSmoothScroller && mSmoothScroller.isRunning()) { mSmoothScroller.stop(); } mSmoothScroller = smoothScroller; mSmoothScroller.start(mRecyclerView, this ); }
1 2 3 4 5 6 7 8 9 10 11 12 13 14 15 16 17 18 19 20 21 22 23 24 25 26 27 28 29 30 31 32 33 34 35 36 37 38 void start (RecyclerView recyclerView, LayoutManager layoutManager) recyclerView.mViewFlinger.stop(); mRecyclerView = recyclerView; mLayoutManager = layoutManager; if (mTargetPosition == RecyclerView.NO_POSITION) { throw new IllegalArgumentException("Invalid target position" ); } mRecyclerView.mState.mTargetPosition = mTargetPosition; mRunning = true ; mPendingInitialRun = true ; mTargetView = findViewByPosition(getTargetPosition()); onStart(); mRecyclerView.mViewFlinger.postOnAnimation(); mStarted = true ; } void postOnAnimation () if (mEatRunOnAnimationRequest) { mReSchedulePostAnimationCallback = true ; } else { internalPostOnAnimation(); } } private void internalPostOnAnimation () removeCallbacks(this ); ViewCompat.postOnAnimation(RecyclerView.this , this ); }
// 可以看到一个滚动的message被发送了出去。所以可以看类ViewFlinger的run方法:
1 2 3 4 5 6 7 8 9 10 11 12 13 14 15 16 17 18 19 20 21 22 23 24 25 26 27 28 29 30 31 32 33 34 35 36 37 38 39 40 41 42 43 44 45 46 47 48 49 50 51 52 53 54 55 56 57 58 59 60 61 62 63 64 65 66 67 68 69 70 71 72 73 74 75 76 77 78 79 80 81 82 83 84 85 86 87 88 89 90 91 92 93 94 95 96 97 98 99 100 101 102 103 104 105 106 107 108 109 110 111 112 113 114 115 116 117 118 119 120 121 122 123 124 125 126 127 128 129 130 131 132 133 134 135 136 137 138 139 140 141 142 143 144 145 146 147 148 149 150 151 public void run () if (mLayout == null ) { stop(); return ; } mReSchedulePostAnimationCallback = false ; mEatRunOnAnimationRequest = true ; consumePendingUpdateOperations(); final OverScroller scroller = mOverScroller; if (scroller.computeScrollOffset()) { final int x = scroller.getCurrX(); final int y = scroller.getCurrY(); int unconsumedX = x - mLastFlingX; int unconsumedY = y - mLastFlingY; mLastFlingX = x; mLastFlingY = y; int consumedX = 0 ; int consumedY = 0 ; mReusableIntPair[0 ] = 0 ; mReusableIntPair[1 ] = 0 ; if (dispatchNestedPreScroll(unconsumedX, unconsumedY, mReusableIntPair, null , TYPE_NON_TOUCH)) { unconsumedX -= mReusableIntPair[0 ]; unconsumedY -= mReusableIntPair[1 ]; } if (getOverScrollMode() != View.OVER_SCROLL_NEVER) { considerReleasingGlowsOnScroll(unconsumedX, unconsumedY); } if (mAdapter != null ) { mReusableIntPair[0 ] = 0 ; mReusableIntPair[1 ] = 0 ; scrollStep(unconsumedX, unconsumedY, mReusableIntPair); consumedX = mReusableIntPair[0 ]; consumedY = mReusableIntPair[1 ]; unconsumedX -= consumedX; unconsumedY -= consumedY; SmoothScroller smoothScroller = mLayout.mSmoothScroller; if (smoothScroller != null && !smoothScroller.isPendingInitialRun() && smoothScroller.isRunning()) { final int adapterSize = mState.getItemCount(); if (adapterSize == 0 ) { smoothScroller.stop(); } else if (smoothScroller.getTargetPosition() >= adapterSize) { smoothScroller.setTargetPosition(adapterSize - 1 ); smoothScroller.onAnimation(consumedX, consumedY); } else { smoothScroller.onAnimation(consumedX, consumedY); } } } if (!mItemDecorations.isEmpty()) { invalidate(); } mReusableIntPair[0 ] = 0 ; mReusableIntPair[1 ] = 0 ; dispatchNestedScroll(consumedX, consumedY, unconsumedX, unconsumedY, null , TYPE_NON_TOUCH, mReusableIntPair); unconsumedX -= mReusableIntPair[0 ]; unconsumedY -= mReusableIntPair[1 ]; if (consumedX != 0 || consumedY != 0 ) { dispatchOnScrolled(consumedX, consumedY); } if (!awakenScrollBars()) { invalidate(); } boolean scrollerFinishedX = scroller.getCurrX() == scroller.getFinalX(); boolean scrollerFinishedY = scroller.getCurrY() == scroller.getFinalY(); final boolean doneScrolling = scroller.isFinished() || ((scrollerFinishedX || unconsumedX != 0 ) && (scrollerFinishedY || unconsumedY != 0 )); SmoothScroller smoothScroller = mLayout.mSmoothScroller; boolean smoothScrollerPending = smoothScroller != null && smoothScroller.isPendingInitialRun(); if (!smoothScrollerPending && doneScrolling) { if (getOverScrollMode() != View.OVER_SCROLL_NEVER) { final int vel = (int ) scroller.getCurrVelocity(); int velX = unconsumedX < 0 ? -vel : unconsumedX > 0 ? vel : 0 ; int velY = unconsumedY < 0 ? -vel : unconsumedY > 0 ? vel : 0 ; absorbGlows(velX, velY); } if (ALLOW_THREAD_GAP_WORK) { mPrefetchRegistry.clearPrefetchPositions(); } } else { postOnAnimation(); if (mGapWorker != null ) { mGapWorker.postFromTraversal(RecyclerView.this , consumedX, consumedY); } } } SmoothScroller smoothScroller = mLayout.mSmoothScroller; if (smoothScroller != null && smoothScroller.isPendingInitialRun()) { smoothScroller.onAnimation(0 , 0 ); } mEatRunOnAnimationRequest = false ; if (mReSchedulePostAnimationCallback) { internalPostOnAnimation(); } else { setScrollState(SCROLL_STATE_IDLE); stopNestedScroll(TYPE_NON_TOUCH); } }

